#How to Install and Configure PHP Composer in MacOS
Explore tagged Tumblr posts
Visit Tumblr Blog
Explore Tumblr blogs with no restrictions, modern design and the best experience.
Last Seen Tumblr Blogs


Fun Fact
Post activity is at the highest at 4:00 pm EDT; notes peak at 10:00 pm EDT.
Text
#mac composer install#composer macbook#download composer for mac#install composer mac#install composer mac os x#installing composer on mac#install composer osx#install composer on mac#composer install mac os#composer install on mac#mac install composer#How to Install and Configure PHP Composer in MacOS
0 notes
Text
Installing and Configuring TYPO3 on Docker Made Simple
Decided on TYPO3? Good call! It’s known for being flexible and scalable. But setting it up? Yeah, it can feel a bit old-fashioned. No stress—Docker’s got your back.

Why Choose Docker for TYPO3?
Docker offers several benefits:
Provides the same environment across all machines.
Makes TYPO3 installation fast and easy.
Keeps TYPO3 and its dependencies separate from your main system to avoid conflicts.
Supports team collaboration with consistent setups.
Simplifies testing and deploying TYPO3 projects.
How TYPO3 Runs in Docker Containers
TYPO3 needs a web server, PHP, and a database to function. Docker runs each of these as separate containers:
Web server container: Usually Apache or NGINX.
PHP container: Runs the TYPO3 PHP code.
Database container: Uses MySQL or MariaDB to store content.
These containers work together to run TYPO3 smoothly.
Getting Started: Installing TYPO3 with Docker
Install Docker on your device (Docker Desktop for Windows/macOS or Docker Engine for Linux).
Prepare a Docker Compose file that defines TYPO3’s web server, PHP, and database containers.
Run docker-compose up to launch all containers. Docker will download the necessary images and start your TYPO3 site.
Access your TYPO3 website through your browser, usually at localhost.
Benefits of Using Docker for TYPO3
Fast setup with just a few commands.
Easy to upgrade TYPO3 or PHP by changing container versions.
Portable across different machines and systems.
Keeps TYPO3 isolated from your computer’s main environment.
Who Should Use Docker for TYPO3?
Docker is ideal for developers, teams, and anyone wanting a consistent TYPO3 setup. It’s also helpful for testing TYPO3 or deploying projects in a simple, reproducible way.
Conclusion
Using Docker for TYPO3 simplifies setup and management by packaging everything TYPO3 needs. It saves time, avoids conflicts, and makes development smoother.
If you want more detailed help or specific instructions for your system, just let me know!
0 notes
Text
A Guide to Local Laravel Development in 2024: Tools and Trends
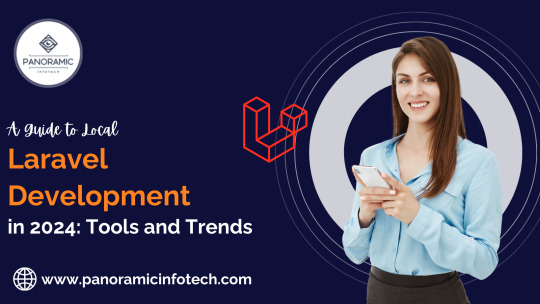
Local Laravel development forms the foundation for building robust web applications, and in 2024, the landscape is evolving with new tools and trends that streamline and enhance the development experience. This guide explores the latest advancements and equips you to set up a powerful local Laravel environment.
The Rise of Containerization with Laravel Sail
One of the most significant trends in Laravel development is the rise of containerization. Traditionally, setting up Laravel environments involved manually configuring dependencies and virtual machines. Laravel Sail, introduced in Laravel 8, simplifies this process by leveraging Docker containers. Sail provides a pre-configured development environment with essential dependencies like PHP, MySQL, and Node.js.
Key Benefits of Laravel Sail:
Reduced Setup Time: No more manual configuration; start with a single command.
Consistent Environment: Ensures every developer has the same setup regardless of their machine.
Improved Reproducibility: Facilitates easy sharing and replication of development environments.
Leveraging Testing Tools for a Robust Development Workflow
In 2024, a robust testing strategy remains crucial. Here are some key tools to integrate into your local Laravel development workflow:
PHPUnit: Laravel’s built-in testing framework for unit and integration tests.
Laravel Dusk: For browser automation and end-to-end testing of Laravel applications.
Debugging Tools: Laravel Telescope and Laravel Debugbar for debugging and monitoring applications.
Setting Up Your Development Environment
Setting up a robust local development environment is essential for efficient Laravel development. Here are some popular tools in 2024:
Laravel Valet: A lightweight development environment for macOS users, offering a seamless experience for running Laravel applications locally.
Homestead: A pre-packaged Vagrant box for Laravel development, suitable for developers using all major operating systems.
Docker: Containerization technology that enables developers to create consistent environments across development, testing, and production.
Version Control and Collaboration
Version control is fundamental for collaborative development:
Git: The most widely used version control system, essential for managing code changes and collaborating with teams.
GitHub, GitLab, Bitbucket: Platforms for hosting Git repositories and managing projects, offering features like issue tracking and pull requests.
Laravel Project Structure
Understanding the structure of a Laravel development project is crucial for organizing your codebase effectively:
app/: Contains the core code of the application, including models, controllers, and middleware.
config/: Configuration files for various services and components.
resources/: Contains assets such as views, language files, and front-end assets.
routes/: Contains route definitions for the application.
database/: Contains database migrations, seeders, and factories.
Dependency Management
Laravel projects use Composer for dependency management:
composer.json: Specifies the dependencies required by the
project.composer.lock: Lock file ensuring consistent dependency versions across installations.
Ready to Build Exceptional Laravel Applications?
Panoramic Infotech offers cutting-edge Laravel Development Services, leveraging the power of this popular PHP framework to create robust and scalable web applications. Contact Panoramic Infotech today to discuss your project and how we can help you leverage the power of Laravel for your business.
Let’s Build Together! Reach out to us at Contact Us to start your Laravel Development with Panoramic Infotech.
This guide equips you with the knowledge to set up a powerful local Laravel development environment in 2024. Remember, the best approach depends on your specific needs. Stay updated with the latest trends to streamline your development workflow and build exceptional Laravel applications.
#Laravel development company#Laravel we Laravel development services#b development company#laravel development#Laravel development solutions
0 notes
Text
How to Implement Laravel Homestead for Local Development
Introduction
In the fast-paced world of Laravel app development, having a robust and efficient local development environment is essential. Laravel Homestead, a pre-packaged Vagrant box, is the perfect solution to streamline your local development process. Whether you're a seasoned Laravel developer or just getting started, this guide will walk you through the steps to implement Laravel Homestead for local development.
What is Laravel Homestead?
Laravel Homestead is a Vagrant box that comes pre-installed with the necessary tools and configurations for Laravel development. It provides an isolated and consistent environment, ensuring that your Laravel apps run smoothly on different machines. With features like PHP, Composer, Nginx, MySQL, and more, Homestead is a one-stop solution for Laravel developers.
Why Use Laravel Homestead for Local Development?
Before we dive into the implementation, let's explore some key reasons why using Laravel Homestead for local development is a great choice:
1. Consistency
Homestead ensures that all team members are working in the same environment, reducing the "It works on my machine" problem. This consistency leads to fewer deployment issues.
2. Isolation
Homestead isolates your development environment, preventing conflicts with other software installations on your local machine. It also provides the ability to work with multiple Laravel projects simultaneously without interference.
3. Easy Setup
Setting up Homestead is straightforward, and you'll have your local development environment up and running quickly. It's especially helpful for beginners in Laravel app development.
4. Compatibility
Laravel Homestead is compatible with various operating systems, including Windows, macOS, and Linux, making it accessible to a broader audience.
Getting Started with Laravel Homestead
Now that we understand the benefits, let's walk through the steps to implement Laravel Homestead for local development:
1. Prerequisites
Before diving in, ensure you have the following prerequisites in place:
VirtualBox or VMware
Vagrant
Git
SSH client (already installed on most systems)
2. Installing Laravel Homestead
Open your terminal and run the following command to install Homestead:
bash
Copy code
vagrant box add laravel/homestead
3. Initializing Homestead
After successfully adding the box, navigate to your Laravel project directory and run:
lua
Copy code
composer require laravel/homestead --dev
Next, initialize Homestead:
bash
Copy code
php vendor/bin/homestead make
4. Configure Homestead.yaml
Edit the Homestead.yaml file generated in your project directory. Here, you can specify details like your desired PHP version, database configuration, and folder mapping for your Laravel app.
5. Launching Homestead
To start your Homestead box, run:
Copy code
vagrant up
6. Accessing Your Laravel App
Once your Homestead box is up and running, you can access your Laravel app through the specified domain in your Homestead.yaml file.
Additional Tips for Laravel App Development
Now that you have Laravel Homestead set up for local development, let's explore some additional tips for your Laravel app development journey:
1. Cross-Platform Compatibility
Laravel allows you to build web applications as well as RESTful APIs that can be consumed by various platforms, including iOS and Android. This cross-platform compatibility is invaluable in today's multi-device world.
2. Leveraging Laravel App Development Companies
Consider partnering with a Laravel app development company, especially if you're working on a complex project or need expert guidance. Laravel app development companies, like [Your Company Name], offer extensive experience and resources to bring your app to life efficiently.
3. Building for iOS and Android
While Laravel is primarily a backend framework, you can build web services and APIs to support mobile app development. For iOS, you can use Swift or Objective-C, and for Android, you can use Java or Kotlin to create native apps that interact with your Laravel backend.
4. Continuous Testing and Integration
Implement continuous testing and integration practices in your Laravel app development workflow. Tools like PHPUnit and Laravel Dusk can help you maintain code quality and catch bugs early in the development process.
5. Keeping Up with Laravel Updates
Laravel is continuously evolving. Stay updated with the latest Laravel releases, security patches, and best practices to ensure your app remains secure and performs optimally.
Conclusion
In this comprehensive guide, we've explored how to implement Laravel Homestead for local development, why it's a valuable tool for Laravel developers, and some additional tips for successful Laravel app development. By following these steps and embracing best practices, you'll be well-equipped to create outstanding Laravel applications for various platforms, ensuring your success in the competitive landscape of app development.
Remember, collaboration with a reputable Laravel app development company can significantly enhance your project's quality and efficiency, so don't hesitate to seek professional assistance when needed. Happy coding!
0 notes
Text
Phpstorm docker xdebug

#PHPSTORM DOCKER XDEBUG HOW TO#
#PHPSTORM DOCKER XDEBUG CODE#
#PHPSTORM DOCKER XDEBUG FREE#
We can run this command: docker-compose run -rm php7.3 php -v which will It is important as we will add special Xdebug settings to the php.ini file. We can tweak our PHP settings whatever we like for our development environment. Docker file installs Xdebug extension with pecl command.# This needs in order to run xdebug from PhpStormĮNV PHP_IDE_CONFIG 'serverName=DockerApp' RUN docker-php-ext-install mbstring bcmath The Dockerfile looks like this: FROM php:7.3 The fileĬontains all the configuration you need for your PHP service - dependencies, libraries, packages, etc. This file describes the php service which is based on a Dockerfile located at docker/php/Dockerfile. :/var/www # map the current folder to the container"s filesystem (so PHP scripts are injected to the container) Init: true # allows sending signals to the PHP process, very helpful to stop process in the middle with Ctrl+C or Cmd+C With the docker-compose.yml that I put in the root of my PHP project: version: "3.7"Ĭontainer_name: myapp # pick a name for the containerĬontext: docker/php # here is the Docker file for this container I am using docker-compose to manage my containers. Debugging PHP scripts # Configure docker container.Docker container with PHP+XDebug installed.
#PHPSTORM DOCKER XDEBUG HOW TO#
And Xdebug is one of the most known tools for PHP debugging.īut how to use it inside of the docker container? Down below I will describe my normal daily setup: Daily work with PHP includes debugging, yeah. However, I wish MacOS performance was better for docker engine. In PHP development flow, Docker is my everyday tool. You can have any version of any service in the container which won't affect each other. Docker also helps you keep your system dependencies under control. It is much easier to spin up a docker container rather than starting a new virtual machine (ie Vagrant). Nowadays we move from using the local environment or virtual machines to Docker-based development.
#PHPSTORM DOCKER XDEBUG FREE#
Protect your site from ddos with free built-in nginx feature ngx_http_limit_req_module.Save all dates in UTC for multi timezone apps.Don't trust files users upload to your server.
#PHPSTORM DOCKER XDEBUG CODE#
My PHP code structure should tell you what it does - or how do I show project's intents to my teammates?.
Why I need a bigger monitor (monitors set) to improve quality of my code?.
One step towards clean architecture from rapid application development.
Clean exceptions with logging and translation.
Clean architecture implemented as a PHP app.
When clean architecture is not worth it.
Authorization and authentication in clean architecture.
Error handling in PHP and formatting pretty error responses to users.
How to validate(check) a php array format (structure).
How to log(see, view) every HTTP request and response in Laravel.
Request handler as a gateway to your backend – keep your code clean.
Clean Laravel app with Prooph message bus.
Make your website partly static and reduce response time.
Nginx to cache dynamic PHP(Laravel) pages.
Frameworkless foundation of your PHP application.
A hacker and a nerd - the two hats of engineers.
PHP 7: Zend Certified Engineer Exam (ZCE).
PHP Cache - practical, reliable, multi driver, multilevel chainable cache.
OpenAPI with PHP - documenting and testing API automatically.
Docker + PHP + Xdebug + PHPStorm = Good Developer Experience.
Expensive Code (Maintainable PHP Backend 1/3).
Evaluation Of Expressions In PHP (as of 7.4).
0 notes
Text
Live Cd Mac For Pc

Mac Cd Reader
Live Cd Mac For Pc Windows 10
Live Cd Mac For Pc Windows 7
Best Cd Ripper For Mac
External Cd Drives For Mac
Live Cd Mac For Pc Windows 8
Active@ LiveCD features & utilities:
Ability to start non-bootable PC for the data access and recovery Boots up any machine from a portable media: CD, DVD, Blu-ray disc or USB flash disk All boot modes supported: legacy BIOS and the latest UEFI secure boot Desktop configuration can be customized & saved to USB, then restored for next sessions Virus detection and infected systems repair, anti-virus scanner included R/W access to: NTFS, FAT/exFAT, Ext2/Ext3/Ext4, BtrFS, F2FS, ReiserFS, HFS+, JFS, UFS, XFS, ZFS Ability to recover deleted, damaged or re-formatted volumes & undelete files being lost Ability to back up volumes & local disks and to restore them back in case of system crash Ability to erase all data on volumes securely, 24 international erasing standards supported Ability to inspect data on a low-level, view & edit raw disk's sectors in hexadecimal editor Ability to reset local user passwords and user account attributes for Windows OS family Software Manager: Downloads & Installs extra RPM packages from web repositories System Tools: Expert Partitioner manages any types of disks, volumes, RAIDs, networking File managers: Dolphin & Krusader let you browse, search, copy/move files & folders Desktop: Control Panel configures User Accounts, Networking, Workspace, Display,... Networking: Connection Manager for Wired and Wireless (Wi-Fi) Connections, VPN,... Networking: Network Folder Wizard connects WebAdv, FTP, SSH & MS Windows shares Desktop: Control Panel configures User Accounts, Networking, Workspace, Display,... Internet: QupZilla web browser, Sylpheed mail client, other tools cab be downloaded Remote access: Remote Desktop Client supports RDP, SFTP, SSH, VNC secure connections Status and health monitoring: Disks, RAM, CPU & Network monitoring utilities included Internet: QupZilla web browser, Sylpheed mail client, other tools cab be downloaded Graphics & multimedia: Image/Picture Viewers, Sound Mixer, CD/DVD Disc Burner Okular Document Viewer previews PDF, EPS, DjVu, FB2, eBook, CHM and other documents Advanced Text Editor previews/edits files stored in many text formats, colouring supported Security: Encrypted with TrueCrypt volumes and files can be attached and managed Console terminals: Konsole Terminal, Super User Mode Terminal, XTerm, Telnet Support tools: Ark Archiver, Calculator, Screen Capture, Info Centre, Clipboard Manager
FLEETWOOD MAC Live CD - Commander 99011 - Printed in W. Condition is Like New. Shipped with USPS Media Mail. Seller assumes all responsibility for this listing. Shipping and handling. This item will ship to United States, but the seller has not specified shipping options.
GParted can be used on x86 and x86-64 based computers running Linux, Windows, or Mac OS X by booting from media containing GParted Live. A minimum of 320 MB of RAM is needed to use all of the features of the GParted application. GParted is free software. You have the freedom to run, copy, distribute, study, change, and improve.
One incredibly useful way that Linux has been adapted to the needs of modern computer users is as a 'live CD,' a version of the operating system that can be booted from a CD (or a DVD or, in some.
I'm not sure You can. You can run the USB is macosx recovery, unibeast automatically makes your USB into a recovery macosx USB. However I have never tried to install.
There are two different types of OS one is Mac OS X Lion 10.7 ISO, DMG and the other one is OS X mountain lion. So please don’t get confused in both OS.
Mac OS X Lion 10.7 is the eighth major release of Mac OS X is a completely different version from the for windows because it is a version that is totally based on the productivity suite for mac os x. This for mac is one of the best and successors of 2011 and it is followed by the for mac of 2007.
Mac os x lion was released in the month of June on the date of 22nd and in the year of 2011 in the Apple worldwide developers conference. It was announced to release officially in the month of July but due to there technicals problems and due to there technical errors they have to release it earlier.
Download: Mac OS X Mountain Lion 10.8 DMG & ISO Image
License Official Installer
File Size 4.4GB / 3.5GB
Language English
Developer Apple Inc.
Tutorials: How to Clean Install Mac OS using a USB drive on Mac
On June 6, 2011, at the Apple Worldwide Developers Conference, it was reported that the official discharge for Lion would be in July 2011. The particular discharge date of July 20 was not affirmed until the day preceding, July 19, by Apple CFO, Peter Oppenheimer, as a major aspect of Apple’s 2011 second from last quarter income announcement.
Apple did not at first report any physical media circulation for Lion, for example, a lot of CD-ROMs or a DVD-ROM as utilized for past discharges. Rather, the working framework was said to be accessible only as a download from the Mac App Store for US$29.99. The main earlier form of OS X that underpins the Mac App Store in Snow Leopard, which suggested that any machines that help Lion at present running Tiger or Leopard would initially be moved up to Snow Leopard, instead of enabling an immediate move up to Lion.
System requirements
Mac Cd Reader
x86-64 CPU (64 bit Macs, with an intel core 2 duo, Intel core i5, intel core i7, or processor.)
At least 2 GB of memory.
Mac OS X 10.6.6 or later (Mac OS X 10.6.8 is recommended) .
7 GB of available space.
Airdrop is supported on the following Mac models:MacBook Pro (late 2008 or newer), MacBook Air (late 2010 or newer), MacBook (late 2008 or newer), iMac (early 2009 or newer), Mac Mini (mid-2010 or newer), Mac Pro (early 2009 with AirPort Extreme card and mid-2010 or newer).
Features
Server features
Mac os x lion
Wiki Server 3 – Making it easier to collaborate, share, and exchange information. Users can quickly switch between a server’s home page, My Page, Updates, Wikis, People, and Podcasts. File sharing is simpler, and a new Page Editor is added for easy customization.

Web DAV File Sharing – Lion Server delivers wireless file sharing for clients that support WebDAV. Enabling WebDAV in Lion Server gives iOS users the ability to access, copy, and share documents on the server from applications such as Keynote, Numbers, and Pages.
Profile Manager – Profile Manager delivers simple, profile-based setup and management for Mac OS X Lion, iPhone, iPad, and iPod touch devices. It also integrates with existing directory services and delivers automatic over-the-air profile updates using the Apple Push Notification service.
Features of Macintosh OS X Lion
The principal variant of Mac OS X was Mac OS X Lion. Macintosh OS X lion – 1.2v3 depended on Rhapsody, a half and half of OPENSTEP from NeXT Computer and Mac OS 8.5.1. The GUI resembled a blend of Mac OS 8’s Platinum appearance with OPENSTEP’s NeXT-based interface. It incorporated a runtime layer called Blue Box for running inheritance Mac OS-based applications inside a different window. There was the talk of executing a ‘straightforward blue box’ which would intermix Mac OS applications with those composed for Rhapsody’s Yellow Box condition, yet this would not occur until Mac OS X’s Classic condition. Apple File Services, Macintosh Manager, QuickTime Streaming Server, WebObjects, and NetBoot were incorporated with Mac OS X lion 1.0 – 1.2v3. We couldn’t utilize FireWire gadgets in Macintosh OS X lion 10.7 iso/dmg.
Macintosh OS X lion 10.7 incorporated the new Aqua UI, Apache, PHP, MySQL, Tomcat, WebDAV bolster Macintosh Manager and NetBoot.
macOS x lion 10.7 is the most recent rendition of Mac with new highlights. Nonetheless, this refresh will keep running on Mac 2012 or later forms. On the off chance that you are running macOS X lion 10.7 or prior, you ought to probably move up to the most recent rendition of mac os x lion 10.7 from the App Store.
Downloading Mac OSX Lion 10.7 ISO/DMG
Live Cd Mac For Pc Windows 10
The main reason for which people preferred downloading apps from the App Store is that it would just download the stub installer (web installer) which is little in size. The real Operating System will begin introducing after running the stub installer.
In this article, you will most likely download MacOS X Lion 10.7 full installer. You can make a bootable USB from the given record and complete a new introduce just as update the present establishment of your Mac OS.
About Apple Security Updates
Live Cd Mac For Pc Windows 7
For their clients’ insurance, Apple doesn’t uncover, examine, or affirm security issues until an examination has happened and fixes or discharges are accessible. Ongoing discharges are recorded on the Apple security refreshes page. For more data about security, see the Apple Product Security page. You can encode interchanges with Apple utilizing the Apple Product Security PGP Key.
If the download fails
Best Cd Ripper For Mac
If so, the only thing you ought to do is to pause and retry later. Or on the other hand, change from a remote to a satellite web association. If it is the case that this doesn’t help, go to App Store > View My Account and restart the download from the Unfinished Downloads segment.
Alternatively, you can also download Mac OS X Lion 10.7 ISO/DMG from our website for free. The installation process will be similar to the installation process of the images downloaded from the app store.
External Cd Drives For Mac
Mac OS X Lion 10.7 ISO / DMG file Direct Download - ISORIVER
There are two different types of OS one is Mac OS X Lion 10.7 ISO, DMG and the other one is OS X mountain lion. So please don't get confused in both OS.
Price Currency: USD
Operating System: Mac OS X Lion 10.7
Live Cd Mac For Pc Windows 8
Application Category: OS
0 notes
Text
WebStorm 2020.3.2 Crack With Torrent + License Key [Latest 2021]
WebStorm Crack
2021 Full Version Download is the world's best cross-platform IDE (Integrated Development Environment) tool for web developers. It has a PHP, JavaScript and HTML code editor to decode and edit them. Plus, Phpstorm 2020 fully hacked provides developers and students with all sorts of tools to help them get going. This software is specially designed for web developers to edit PHP, CSS, XML, HTML and JavaScript files. Moreover, it helps to edit all kinds of source codes in any language. In addition, it is compatible with PHP 5.3, 5.4, 5.5-7.4, including coroutines and generators.
PhpStorm Crack full activation code download is in Java language but compatible with all kinds of languages. It has many built-in plugins to help users create other plugins to decode different languages. Plus, it has built-in code completion, bookmarks, breakpoints, and scaling options. In addition, it has macros, quick navigation, excellent code analysis, which greatly helps users in their work. It makes complex projects easier to do in a simple way. You can also rewrite different codes to the desired language. Besides, this tool is also compatible with any external source like X Debug.
PhpStorm Crack Key Latest 2021 consists of a powerful SQL editor that shows you all the details about the work. WebStorm is also the best IDE editor. PhpStorm has all the features of WebStorm plus additional unique key features. This is the best PHP editor. Plus, it has a simple and easy-to-navigate navigation bar that makes it easy to manage your work. Shortcuts are also part of the navigation bar. You can easily use advanced tools using these shortcuts. In addition, these tools will help you analyze your work from different angles.
Also Download,
FontLab Crack
New Changes in Version 2020.3.2 Build 203.7148.26:
Some improvements have been made in the metadata
Moreover, fix the issue of the subdirectory where the inspection was unable to work properly through dockerized phpstan
Also, some keys are added for the Array shape of params
Resolve the server issue related to X debugger older than 2.9
Moreover, a new search console to find the required files more easily
Also, resolve the unsuccessful command issue between the Phpstorm and X debugger older than 2.2
Improvements for Vue WEB-31721 +26 support
Further, fix a crash related to the usage of old Xdebuger
Moreover, fix all the crashes related to old Xdebuger command and duplicate comment issue
All types of language support feature
Also, Xdebuger 3 with many new streamline configuration with multiple supports
Furthermore, you can now process Guzzle request
Fix the problems of namespace and language attribute
Phpstorm minor functional improvements
A new major update that brings support for PHP 8 with a new welcome screen and much more
Also, new language support with a new code reader and much more
Improvements in many new editing codes and PHPUnit tests with WSL interpreter
A new VUE-loader to support VUE- templates
Moreover, fix an issue of IDEA-241935 +12
Fix an issue that IDE does not work after update
Moreover, IDE-242047 +24 issue resolve
Added compatibility for custom Satis/Packagist packages and JSON composer
Also, new getter and setter on the fly
Fix issue related to PHP doc comment
There is a new file name as the class in the PHAR files for the improved performance
Further, this version support to open multiple projects in the same window to handle them easily
Also, abrupt fixes for trivial cases
Keyboard improvements by improving the duplicate check
Also, fix the issue of trait collision to sole the overrides issues
What’s New in Crack Version 2021?
Addition of GitHub Pull support
Also, a new flow analysis for PHP control
New widgets for work inspections
Usage improvements related to implement-base-method
Further, fix broken artisan commands
Also, the culmination of PHP XDebug >= 2.9 configuration
Solve the problem related to PHP command-line tools
Work through unregistered servers is no more compatible with the latest version
Missing type hint for PHP is now available
Further, support for Windows Subsystem
Added support for PSR 12 code style
PHP 7.4 edition support
PhpStorm Key Features [Mac/Win]:
Super IDE PHP web development tool with lots of useful features
Also, has a rich code editor, code formatting system, and syntax highlighter
Further, automated code generation and completion
Available in near about all types of famous world languages
It has many new writing and code styles
You can make any change in your work with just a single click
Moreover, fully compatible with PHP Doc
Also, it helps you in the duplicate code detection method
It has many new twig and smarty templates to style your codes
PHP code checker that sniff code smells on the fly
Furthermore, it has PHAR support as well as SQL support
A free trial version of PhpStorm is also available
Featured with the version control system
Further, it has remote development for FTPS, FTP, SFTP that is dependent on automatic synchronization
Also, integrated with Google application engine support for PHP
It helps to track any disturbance in your project
Moreover, it has better testing and debugging system for developers
In addition, it is laced with all types of CSS, HTML, SSL, SCSS, SASS, LESS, and JavaScript features
Also Download,
Visual Studio 2021 Crack
PhpStorm 2020.3.2 Activation Code + Key:
NHVGC-UGTFX-LIKNR-53ZED-9VFX3-58CZ2
XFSEW-KJHIU-BHGYT-BVGFT-VCDRE-KJHYT
CFDTR-KJHYT-CFDRE-XDSEW-DSEWI-VCFDE
56432-CFDSE-65432-BHGFR-90876-BCFDR
45CFD-65CFD-78HGT-89NHG-89NBV
CDF56-NHG90-BHG90-BHJG90-NVF90
System Requirements:
Windows: Vista, XP, 10, 8, 7, 8.1, 2002
Mac: macOS 10 and later
RAM:5 GB
Free disk space for downloading 1 GB
1080 x 720 screen resolution is enough
5 GHz processor
How to Activate/ Crack?
1st of all, install the Free Trial Version of PhpStorm
2nd, carry out it completely
Now download the PhpStorm Crack 2021 Latest Version given here
Extract the file completely in the download folder
Add it to the archive
Run the installation procedure by following the given way
Copy-paste the Activation Code
Wait till the complete downloading
Restart your system after that
Enjoy! The latest version
If You Like Some Other Relatives Software :
IDM Activator 6.38 Build 16 Crack With Serial Key Free Download 2021
IDM 6.38 Build 16 Universal Crack Patch Keygen Serial Download
Z3X Samsung Tool Pro 41.11 Crack + Without Box Direct Loader [No Card]
Gihosoft TubeGet Activation Key + Crack 8.6.18 (Mac/Win) Torrent 2021
0 notes
Link

Disclaimer: I’m writing about my experience with major OS (Windows 10, macOs High/Sierra, Ubuntu/Manjaro) using a Solid State Drive. It has a huge impact in term of speed and it could be different from your own experience.
Hello there. To begin with, this post isn’t about what’s the best OS for everyday programming, it could depend on the stack used, Misc programs and specially YOU, so i’ll try to describe all the good/bad things that happened during my everyday workflows.
But before that I should let you know my programming stack so you won't get confused later. I mainly use:
PHP frameworks and CMS
nodejs frameworks for frontend
react native/ionic for mobile dev
Photoshop (with CssHat) for HTML Integration, banner for mobile apps.
ms office due to my current job.[1]
Ubuntu (Unity/Gnome):
By the end of 2015 and after a good run with Windows 7 and using Ubuntu just occasionally in virtual machines I thought I would give it a shot with a daily usage so I installed the 15.10 version. back then i was programming in PHP, Java and C# (because of my Software engineering Studies), php and apache had great performances locally, same for java but used a windows 7 VM for Visual Studio, Ms Office and Adobe Photoshop, because all the alternatives (Darkable/Gimp, Open office) weren't at the same levels. I tried but the more you use them the more you notice their weak points such as ease of use, backward compatibility.
I had a good (exactly 2 years) run switching between Unity and Gnome DE (I was the n°1 hater for KDE btw), but over time and even with SSD it felt a kinda slow (I was always stuck with 16.04 LTS) and honestly, I wasn’t fan of the Ubuntu’s PPAs either and then I discovered the Hackintosh community.
macOs (10.12/10.14)
So after a hell of an installation process I managed to run macOs Sierra smoothly on a laptop that has hardware near to macbook pro late 2012 (HP elitebook 840 G1). Apps installed with one simple drag n’ drop (applies to android studio too). It run the Android Virtual Device smoother than windows 7 and ubuntu with the same laptop, i was very surprised, the memory management, the apps integration and the overall stability was so great. At that time I finished my studies so no more Java or .Net programming, and the adobe/ms office suite was a strong point compared to Linux in general so every program ran natively without the need of any VM, with our beloved Unix cli.
The only drawback I had with mac, or with hackintosh, is the system updates/upgrades it was so painful to do it breaks your system every time, I was backing up the whole bootable system image whenever I attempted to update. Because the Kexts (Kernel extensions or “drivers”) weren’t always backward compatible.
So in the end i was thinking to go back to linux again but not sure which distribution i will stick with again, I wanted a stable distro that i forgot completely about something called upgrades of “big updates”. In the meantime I give Windows 10 another shot after hearing it got better and better in the last years.
And again, after 2 years with no workflow complaints I backed up my hackintosh installation and installed the last build of windows 10.
Windows 10.
I’ll resume my experience with one line: “not great, not terrible” Compared, again, to mac os the system was very smooth in every way, snapping windows, switching virtual desktops, programs and files search in the start menu, no problem but! I already missed the unix cli. Yeah I know there’s cmder and other tools. The overall performance was okay but there was some latency when compiling node js apps. My workflow didn’t change. I used Laragon for all my php projects with phpstorm and it was perfect honestly. On the other hand Android Emulator was terrible even with 8gb or ram and ssd, mac os was handling it way better.
In the meantime I played with some linux distros in VMs and made the choice: Manjaro, KDE flavor.
Manjaro:
“You said you hated KDE right?” well yes but for a cause, one I didn’t want to bring back the Gnome memories i had with Ubuntu and second, I disliked is because its similarity in UI compared to Windows in general, 10 specially then I found how very customizable was and again i’ll resume it with one line: “everything is a widget”. So in term of UI I made my simple comfortable setup.
Now in term of programs and workflow I still use PhpStorm for my php and nodejs projects, npm and yarn installed globally and surprisingly npm run very fast compared to windows and mac; git already installed, but for my php projects I migrate all of them to docker with docker compose, majority of projects were based on Laravel, Prestashop, Wordpress and old native php apps. I managed to dockerize some of them from scratch, some with Laradock.
Java/.Net: RIP.
For mobile development there were some struggles during configuring ionic and react native’s first run but done with them quickly, no problem with android studio but the emulator “again” wasn’t that good as mac os, but not that bad like windows. And I discovered a helpful package that cast my connected android device to my screen and it’s shown as a virtual device but a physical one, called scrcpy from the genymotion team!
And finally these are just some of the benefits why I picked manjaro:
No big breaking updates.
A rolling release distro.
Fast security patches.
The Great Arch User Repository (AUR)
Snap and Flatpak support (but why?)
Very stable.
But still there are some drawback, linux’s ones in general:
Still needing photoshop and lightroom.
Ms Office for work purpose (Managed to use Web version since we have ms365 but still miss Excel for heavy use)
Conclusion:
Finally and personally I’ll stick with linux for these main two reasons: native support for docker (future projects could be deployed with it) and the unix environment similarity to production servers (cli, ssh and packages’ configuration). I understand many of you will disagree for many things said in the post but that’s okay! because, finally, we choose what will help us to give the most of us in terms of productivity.
Thank you all for reading the most boring post ever made on Dev.to platform! I would gladly hear from you some of your thoughts and experiences as well. Thanks again! [1]
[1]: edit. added used stack and a conclusion.
0 notes
Text
How to Install Magento 2 Via XAMPP | Magento Tutorial 2020
Creating a localhost environment is one of the essentials for running a website. When running the localhost, your Magento 2 XAMPP site will run faster and the system will be more secure.
It also provides an ideal testing environment on your computer, keeping you away from the prying eyes of hackers. This article will give you useful information about Magento 2 XAMPP and how to use it effectively.
What is XAMPP?

In the technical aspect, Magento XAMPP software is standard software and is often used by developers to create and develop Websites.
XAMPP is often used to create Website servers with Apache, PHP, MySQL/MariaDB (XAMPP 5.5.30 and 5.6.14, XAMPP ship MariaDB instead of MySQL but the commands and tools are the same for both), FTP Server, Mail Server built-in and tools such as phpMyAdmin.
Magento XAMPP Pros

XAMPP can run on all operating systems such as Windows, macOS, Cross-platform, and Linux.
XAMPP has a simple configuration and many useful functions for users, such as server emulation, Mail Server emulation, and SSL support on Localhost.
Instead of installing each of the above components, now you need to use XAMPP to get a complete Website server.
Open source: XAMPP has a convenient open setting for you to freely edit following your reference.
PWA feature: The Web App (or PWA) brings more people to your business, to increase conversions and generate more leads.
However, you need the GraphQL Language feature in Magento 2.3 to run the PWA settings.
Higher security:
With support for PHP 7.2x, Magento will be enhanced performance and security. The equipment of reCAPTCHA and 2FA (two-factor authentication) adds many layers of protection against malicious access when someone attempts to break into your Magento admin panel.
Magento XAMPP Cons

In contrast to its simple configuration, XAMPP has a complicated admin setting system to adjust, followed by a lot of very complex tuning system commands.
XAMPP’s capacity is also relatively massive due to its installation file size, which is 141Mb.
Ways To Install Magento 2 XAMPP
More details:
Some Magento Extension reviews
Other Magento product guides

Install Magento XAMPP
Step 1: Download XAMPP
Download the newest XAMPP version on Apache Friends Website:
https://www.apachefriends.org/index.html

Step 2: Install XAMPP
Double-click on the file to install XAMPP.
Click Next.

Afterward, please follow the guide and select the most suitable selections for you.

After finishing the installation, the setup will now install XAMPP on your computer. Please wait for a while.
Besides, you will see the option “Do you want to start the Control Panel now?”. Keep it selected and click Finish to exit setup and enter XAMPP Control Panel.
Step 3: Configure XAMPP
In XAMPP Control Panel, click the “Config” button on Apache row and click “PHP (php.ini).”
In the PHP, find these rows:
extension=php_curl.dll extension=php_pdo_sqlite.dll extension=php_pdo_mysql.dll extension=php_soap.dll
After the installation, remember to turn on the Apache and MySQL/MariaDB by clicking the “Start” button.
Step 4: Configure the host file
Open file:
“C:\Windows\System32\drivers\etc\hosts”.
Add the following line to the last row of the file:
127.0.0.1 www.localhost.com
Download & install Magento 2
Note: There are 2 versions of Magento settings:
Simple Data: customer information, product, quantity, promotion included…
No Simple Data: will be blank after installation.
Step 1: Download Magento 2 from the following:
https://magento.com/tech-resources/download

Source: Blankapham.com
Sign in to your account to choose the downloading format and download it.
Step 2: Extract the archive file
After completing the download process, create a folder inside “xampp\htdocs” and extract the downloaded archive file into that folder.
Step 3: Generate a new empty database for Magento 2 XAMPP
Browse the URL “http://localhost/phpmyadmin/” to access the phpMyAdmin page.
Create a database name (“Magento 2”, for example).

Source: Blankapham.com
Step 4: Install Magento 2
In your browser, enter the URL “http://localhost/your_database_name” to start installing Magento 2. (for example “http://localhost/Magento2”)
Read all the terms & agreements if it’s in need and then click “Agree and Setup Magento “
Click “Start Readiness Check “
Step 5: Save php.ini file and restart XAMPP
Click “Try Again” to refresh Magento 2 Installation page
Step 6: Fill in the blank
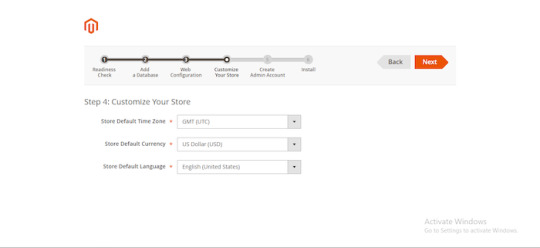
Fill in the information fields based on the database names that you set in the previous step

Enter the URL for your Website address. You can leave these by default or edit as you wish

Edit your Website’s time zone, default currency, and language
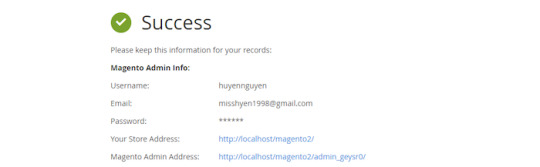
Create an admin account
Note:

During the installation of XAMPP software, you should turn off every other programs and software to avoid application conflicts to ensure that the installation process becomes successful.
For instance, in case the Windows 10 server has IIS installed, it can not install XAMPP, which will be a conflict with each other.
In case your computer is using Skype, open Skype -> Tools -> Connection Options -> and uncheck “Use port 80 and 443 … ..”. Without doing this, XAMPP would not be able to run because Skype used the network port 80.
Besides, it would be best if you also uninstalled all other Antivirus software, as these may block port 80 or Website server applications, making XAMPP inoperable.
Step 7: Finish installation
After completing all the information about your Website, you have reached the final stage.
Some Must-know Query Answers

#1. Where are the main XAMPP configuration files?
MySQL configuration file:
\xampp\mysql\bin\my.ini
PHP configuration file:
\xampp\php\php.ini
FileZilla Server configuration file:
\xampp\FileZillaFTP\FileZilla Server.xml
Apache main configuration files:
\xampp\apache\conf\httpd.conf \xampp\apache\conf\extra\httpd-xampp.conf
Apache Tomcat configuration file:
\xampp\tomcat\conf\server.xml
\xampp\sendmail\sendmail.ini
Mercury Mail configuration file:
\xampp\MercuryMail\MERCURY.INI
#2. Why are pictures and style-sheets not available?
There are some problems displaying pictures and style-sheets.
To solve this, you need to enable one of the following lines in the file “\xampp\apache\conf\httpd.conf”:
EnableSendfile off
EnableMMAP off
#3. Can you delete the “install” directory after the installation?
The answer is you had better not do that because those scripts are still needed for all additional packages (add-ons) and upgrades of XAMPP.
#4. Why some PHP open source applications do not work with XAMPP on Windows?

We regret to announce that XAMPP generated some PHP applications and extensions for Linux, which haven’t been ported to Windows.
#5. Ways to configure the antivirus application

All dependencies and servers required for running website applications are included below.
Windows operating system with an antivirus application enabled may slow down the installation remarkably, and one of the servers (website server, database server) may be blocked too by the antivirus software.
If you have an antivirus tool enabled, the following settings are for running XAMPP with no performance issues:
Add exceptions in the firewall: for Apache, MySQL, or the other servers.
Scan files when executing: Having the antivirus scanned for all data, you would slow down the executable files for the servers.
Scan the traffic for different URLs: Exclude “localhost” traffic in the Antivirus settings if you are developing with XAMPP on your machine.
Conclusion
Although XAMPP still has some defects, all the great features that Magento 2 XAMPP brings are undeniable. Please feel free to experience the utility or shortcomings of XAMPP yourself!
Besides, if you found this informative, there are still many other interesting articles:
How to Install Magento 2 Via Composer | Magento Tutorial 2020
5 Minutes to Master in Using Magento 2 Business Intelligence Tools
How to Configure Download Options in Magento 2
The post How to Install Magento 2 Via XAMPP | Magento Tutorial 2020 appeared first on Mageguides.
from Mageguides https://ift.tt/2UaCann via IFTTT
0 notes
Text
8+1 reasons why I love to work with docker containers
I like to work and experiment on totally different projects all the time. Every month I intend to put my hands on something new and interesting, discovering exciting technologies and solutions. This means that I usually find myself working on totally different things, from Electron applications to Drupal websites to python scripts or pure C code, and the list goes on and on.
The last thing that I need is to have a development environment a complete mess. But, how can you keep everything organized and clean, and most of all, flexible to change?
I use docker for more than 3 years now, in a way that gives me the possibility to be flexible on change, and support all my needs on any project. And a have a few good reasons why I choose docker.
1. Easy to set up
docker is really easy to install on any machine. There are versions for Linux, Windows and MacOS available, totally free, ready to download and use. For Linux there is docker CE available at distributions’ repositories. For MacOS and Windows there are Docker Desktop for Mac and Docker Desktop for Windows.
Also, I use docker-compose for the installation and configuration of my containers, using YAML files per project. I surely propose you to install it as well, because it will make your life much more easy.
2. Works the same way on every OS
No matter what is your preferable operating system, with docker you can have the same experience anywhere. Especially if you work in a team of developers, all the team members will have the same development environment, with no differences. That way you eliminate situations like “But, it works on my machine”.
3. Based on community
You don’t need to reinvent the wheel, nor you need to be a devop to use docker for development. There are thousands of docker images, which you can use at any time, and you can find at docker hub.
You have to take care though what exactly you are using. Check how many are using the image you found. Is it based on official images? Is it certified by docker? How were they build?
4. Extend it
Let’s say that you found a very good and suitable image, but while you work on your project you realize that it is not 100% what you wanted, what can you do? You can go and search for an other image or you can extend it and create your own images, which you can share with your team and maybe with the rest of the community. This way you minimize the possibility to have different development environment inside the team.
5. Lightweight
Based on the way docker works, where you can have multiple containers based on the same image, makes it extremely lightweight. The reserved space in your hard disk will be the absolute minimu because only the changes from the base image are saved. For example, if you use a PHP image in multiple containers, docker doesn’t reserve multiple times the same amount of data in your hard disk.
There are also images based on OS distributions that reserve small space, like the Alpine Linux.
6. Different technology versions
Depending on the structure of your containers, there are ways to have different images with different versions of the same technology. For example, what I like to have is different versions of PHP, i.e. 5.6, 7.1 and 7.2. This helps me to be able to run legacy code, while whenever I want, I can easily change it to a newer version and work on resolving issues.
7. Easy to transfer
If you use plain docker commands or docker-compose, you just need to recreate the development environment on any computer that has docker installed. You don’t need to transfer hundreds of MB, because you can always pull the images from the online repositories. If you happen to use version control system with your code, just pull it as well and you are ready to start working again.
8. Isolated applications and security
A docker container image contains all the necessary software for your application to work, including code, system tools, system libraries and settings. Containers do not use software from the host computer in any way and cannot access the host system files. This makes them pretty secure for you to work on.
9. Easy shareable and strong community
We can find docker containers everywhere, in Data centers, in Cloud, in Serverless systems, in Linux, Windows, MacOS and many others. This means that there is a really big community where you can find help and information.
There are many events happening around the globe, the biggest of all is DockerCon, where you can meet many people that use docker.
Wrapping up
Before I wrap up this post, let me give you a list of useful stuff that might be help you starting with docker.
Most of the well know IDEs there are plugins for docker, which can help you manipulate your local containers. I like to use VSCode, and I recommend an extension named... eehm... Docker.
For containers manipulation I recommend to use Portainer, which can be used as an individual container. With that you can create, start, stop, delete containers or images, you can investigate logs, get info on CPU and memory usage and many other things.
Finally, you can find my own created images at https://hub.docker.com/u/walkero.
0 notes
Text
Getting Started With Symfony 4
Through this article, we are going to take a look at the Symfony 4 framework made by SensioLabs.
Introduction
To create a web application, we have many tools at our disposal. Choosing is sometimes a hard task. However, some tools are some kind of reference, as Symfony is. Here, we are going to have an overview of this framework. To achieve this, we are going to use the fourth version.
What is Symfony?
Symfony is the leading PHP framework available to everyone under an Open Source license. It is built on top of a set of decoupled and reusable components named Symfony Components. Symfony use generic components to allow us to focus on other tasks.
An overview of some elements
Before we dive into the code, let's have an overview of some elements used by Symfony to understand better what we are going to do.
Symfony Components
Symfony Components are a set of decoupled and reusable PHP libraries. Those components can even be used without Symfony.
Symfony Flex
Symfony Flex is a way to install and manage Symfony applications. It automates the most common tasks of Symfony applications.
It is a Composer plugin that modifies the behavior of the require, update, and remove commands. For example, when we execute the require command, the application will make a request to the Symfony Flex server before trying to install the package with Composer. If there is no information about that package that we want to install, the Flex server returns nothing and the package installation follows the usual procedure based on Composer. If there is information, Flex returns it in a file called a "recipe" and the application uses it to decide which package to install and which automated tasks to run after the installation.
Flex keeps tracks of the recipes it installed in a symfony.lock file, which must be committed to our code repository.
Recipes are defined in a manifest.json file and the instructions defined in this file are also used by Flex when uninstalling dependencies to undo all changes.
Security Checker
Security Checker is a command-line tool that checks if our application uses dependencies with known security vulnerabilities.
Doctrine
Symfony doesn't provide a component to work with databases. However, it provides an integration of the Doctrine library. Doctrine is an object-relational mapper (ORM). It sits on top of a powerful database abstraction layer (DBAL).
In a few words, Doctrine allows us to insert, update, select or delete an object in a relational database. It also allows us to generate or update tables via classes.
Twig
Twig is a template engine for PHP and can be used without Symfony, although it is also made by SensioLabs.
A few terms
Through our example, we are also going to use a few terms. Let's define them before.
Controller
A Controller is a PHP function we create. It reads information from a Request Object. It then creates and returns a Response Object. That response could be anything, like HTML, JSON, XML or a file.
Route
A Route is a map from a URL path to a Controller. It offers us clean URLs and flexibility.
Requests and Responses
Symfony provides an approach through two classes to interact with the HTTP request and response. The Request class is a representation of the HTTP request message, while the Response class, obviously, is a representation of an HTTP response message.
A way to handle what comes between the Request and the Response is to use a Front Controller. This file will handle every request coming into our application. It means it will always be executed and it will manage the routing of different URLs to different parts of our application.
In Symfony, incoming requests are interpreted by the Routing component and passed to PHP functions that return Response Objects. It means that the Front Controller will pass the Request to Symfony. This last one will create a Response Object and turns it to text headers and content that will finally be sent back.
Project structure
When we will start our project, our project directory will contain the following folders:
config - holds config files
src - where we place our PHP code
bin - contains executable files
var - where automatically-created files are stored (cache, log)
vendor - contains third-party libraries
public - contains publicly accessible files
A simple example
Now we know more about Symfony, it is time to do something with it.
Setting up our project
Let's first start by creating our project. We can do as Symfony's documention suggets or with, for example, use PHP Docker Boilerplate if we want to use Docker. However, we have to be sure that we have at least PHP 7.1 and our configuration allows URL rewriting. If we are a macOS user, we can encounter some trouble with our PHP version. An explanation of how update our PHP version can be found here. We also have to be sure that we have the latest version of Composer.
Following Symfony's documention, it is something like so:
composer create-project symfony/skeleton simple-app
Setting up our project
This creates a new directory named simple-app, downloads some dependencies into it and generates the basic directories and files we need to get started.
Now, let's move into our directory to install and run our server:
cd simple-app composer require server --dev php bin/console server:run
Installing and running our server
Now, if we use PHP Docker Boilerplate, it would be like so:
git clone https://github.com/webdevops/php-docker-boilerplate.git simple-app cd simple-app cp docker-compose.development.yml docker-compose.yml composer create-project symfony/skeleton app composer require server --dev docker-compose up -d
Installing Symfony using PHP Docker Boilerplate
Webserver will be available at port 8000.
We also have to change some values in etc/environment*.yml:
DOCUMENT_ROOT=/app/public/ DOCUMENT_INDEX=index.php
etc/environment*.yml file
To run the Symfony CLI, we can do it like so:
docker-compose run --rm app php bin/console server:start # OR docker-compose run --rm app bash php bin/console server:start
Running Symfony CLI using PHP Docker Boilerplate
When or project is ready, if we want to install Security Checker, we have to do it like so:
composer require sec-checker
Installing Security Checker
We also want to install the Web Debug Toolbar. It displays debugging information along the bottom of our page while developing.
composer require --dev profiler
Installing Web Debug Toolbar
Maybe changing the permissions for the debugger will be necessary.
chmod -R 1777 /app/var
Changing permissions
Creating our first page
Let's now make our first page. But, first, let's install what we are going to use to define our Routes:
composer require annotations
Installing Framework Extra Bundle
This allows us to use Annotation Routes instead of defining them into a YAML file. We also need to install Twig:
composer require twig
Installing Twig
We can now create our first template:
<h1>Hello World!</h1>
templates/hello.html.twig file
Now, let's create our first Controller:
namespace App\Controller; use Symfony\Bundle\FrameworkBundle\Controller\Controller; use Symfony\Component\HttpFoundation\Response; use Symfony\Component\Routing\Annotation\Route; class SimpleController extends Controller { /** * @Route("/") */ public function index() { return $this->render('hello.html.twig'); } }
src/Controller/SimpleController.php file
Now, let's try our newly created page by visiting http://localhost:8000.
Connecting to the database
Now, it is time to try to connect our application to a database. Here, we are going to use MySQL. First, we have to install Doctrine and the MakerBundle.
composer require doctrine maker
Installing Doctrine and MakerBundle
Now, we can edit the .env file like so:
DATABASE_URL="mysql://db_user:[email protected]:3306/db_name" # If we are using PHP Docker Boilerplate, it will be something like that: # DATABASE_URL=mysql://dev:dev@mysql:3306/database
.env file
We can now use Doctrine to create the database:
php bin/console doctrine:database:create
Creating the database
Entity Class and Migrations
We are now ready to create our first Entity Class. Let's do it like so:
php bin/console make:entity Post
Creating a Post Entity
Each property of an Entity can be mapped to a column in a corresponding table in our database. Using mapping will allow Doctrine to save an Entity Object to the corresponding table. It will also be able to query from that same table and turn the returned data into objects.
Let's now add more fields to our Post Entity:
namespace App\Entity; use Doctrine\ORM\Mapping as ORM; /** * @ORM\Entity(repositoryClass="App\Repository\PostRepository") */ class Post { /** * @ORM\Id * @ORM\GeneratedValue * @ORM\Column(type="integer") */ private $id; /** * @ORM\Column(type="string", length=100) */ private $title; /** * @ORM\Column(type="text") */ private $content; /** * @ORM\Column(type="text") */ private $content; }
Entity/Post.php file
Now we are ready to update our database. First, let's create a migration:
php bin/console doctrine:migrations:diff
Creating a migration
And now, we can execute our newly generated migration:
php bin/console doctrine:migrations:migrate
Running our migration
We now need to create public setters and getters for our properties:
... public function getId() { return $this->id; } public function getTitle() { return $this->title; } public function setTitle($title) { $this->title = $title; } public function getContent() { return $this->content; } public function setContent($content) { $this->content = $content; } public function getExcerpt() { return $this->excerpt; } public function setExcerpt($excerpt) { $this->excerpt = $excerpt; } ...
Entity/Post.php file edited
We can now create a corresponding Controller like so:
php bin/console make:controller PostController
Creating a Controller
Let's edit our Controller to have something like so:
namespace App\Controller; use App\Entity\Post; use App\Repository\PostRepository; use Symfony\Bundle\FrameworkBundle\Controller\Controller; use Symfony\Component\HttpFoundation\Request; use Symfony\Component\HttpFoundation\Response; use Symfony\Component\Routing\Annotation\Route; class PostController extends Controller { /** * @Route("/posts", name="post") */ public function index(): Response { $posts = $this->getDoctrine() ->getRepository(Post::class) ->findAll(); return $this->render('posts/list.html.twig', ['posts' => $posts]); } }
Controller/PostController.php file edited
As we can see in the above code, we query our posts before we pass the result to a view. To get our items, we use what is called a Repository. This last one is a PHP class that helps us to fetch entities of a certain class. We can edit this Repository class if we want, so we can add methods for more complex queries into it.
We can now edit the base.html.twig template and create a new named list.html.twig in a new subdirectory called posts.
<!DOCTYPE html> <html> <head> <meta charset="UTF-8"> <title>{% block title %}Simple App{% endblock %}</title> {% block stylesheets %}{% endblock %} </head> <body> {% block body %}{% endblock %} {% block javascripts %}{% endblock %} </body> </html>
templates/base.html.twig file
{% extends 'base.html.twig' %} {% block body %} <h1>Posts</h1> <table> <thead> <tr> <th scope="col">Title</th> <th scope="col">Actions</th> </tr> </thead> <tbody> {% for post in posts %} <tr> <td>{{ post.title }}</td> <td> <div class="item-actions"> <a href=""> See </a> <a href=""> Edit </a> <a href=""> Delete </a> </div> </td> </tr> {% else %} <tr> <td colspan="4" align="center">No posts found</td> </tr> {% endfor %} </tbody> </table> {% endblock %}
templates/posts/list.html.twig file
Now, if we go to localhost:8000/posts, we will see a pretty rough interface and our empty posts list.
To fill our posts list, we are going to create a form. Let's install a new component:
composer require form
Installing Form component
And of course, we need to validate that form. We can make it with Validator:
composer require validator
Installing Validatior
We can now create a template for our form:
{% extends 'base.html.twig' %} {% block body %} <h1>New post</h1> {{ form_start(form) }} {{ form_widget(form) }} {{ form_end(form) }} <a href="{{ path('posts') }}">Back</a> {% endblock %}
templates/posts/new.html.twig
Here, we create the template that is used to render the form. The form start(form) renders the start tag of the form while the form end(form) renders the end tag of the form. form widget(form) renders all the fields, which includes the field element itself, a label and any validation error messages for the field. It is also possible to render each field manually as described in the Symfony documentation.
We also need to edit our Post Entity:
namespace App\Entity; use Doctrine\ORM\Mapping as ORM; use Symfony\Component\Validator\Constraints as Assert; /** * @ORM\Entity(repositoryClass="App\Repository\PostRepository") */ class Post { /** * @ORM\Id * @ORM\GeneratedValue * @ORM\Column(type="integer") */ private $id; /** * @ORM\Column(type="string", length=100) * @Assert\NotBlank() */ private $title; /** * @ORM\Column(type="text") * @Assert\NotBlank() */ private $content; /** * @ORM\Column(type="text") * @Assert\NotBlank() */ private $excerpt; ... }
Entity/Post.php file edited
Validation is done by adding a set of rules, or constraints, to a class. A completed documentation about those different rules can be found here. In Symfony, validation is applied to the underlying object, it means it is checked if the object, here Post, is valid after the form has applied the submitted data to it.
Now, edit our PostController like so:
namespace App\Controller; use App\Entity\Post; use App\Repository\PostRepository; use Sensio\Bundle\FrameworkExtraBundle\Configuration\Method; use Sensio\Bundle\FrameworkExtraBundle\Configuration\Security; use Symfony\Bundle\FrameworkBundle\Controller\Controller; use Symfony\Component\HttpFoundation\Request; use Symfony\Component\HttpFoundation\Response; use Symfony\Component\Routing\Annotation\Route; use Symfony\Component\Form\Extension\Core\Type\TextType; use Symfony\Component\Form\Extension\Core\Type\TextareaType; use Symfony\Component\Form\Extension\Core\Type\SubmitType; class PostController extends Controller { /** * @Route("/posts", name="posts") */ public function index(PostRepository $repository): Response { $posts = $this->getDoctrine() ->getRepository(Post::class) ->findAll(); return $this->render('posts/list.html.twig', ['posts' => $posts]); } /** * @Route("/posts/new", name="new") * @Method({"GET", "POST"}) */ public function new(Request $request) { $post = new Post(); $form = $this->createFormBuilder($post) ->add('title', TextType::class) ->add('content', TextareaType::class) ->add('excerpt', TextareaType::class) ->add('create', SubmitType::class) ->getForm(); $form->handleRequest($request); if ($form->isSubmitted() && $form->isValid()) { $em = $this->getDoctrine()->getManager(); $em->persist($post); $em->flush(); $this->addFlash('success', 'post created'); return $this->redirectToRoute('posts'); } return $this->render('posts/new.html.twig', [ 'form' => $form->createView(), ]); } }
Controller/PostController.php file edited
In the first part of our new method, we use the Form Builder. We add three fields, corresponding to the properties of the Post class and a submit button.
We then call handleRequest to see if the form was submitted or not when the page is loading. If the form was submitted and if it is valid, we can perform some actions using the Post Object.
As we can see, here we use the persist method that tells Doctrine to "manage" the Post Object. We then call the flush method that tells Doctrine to look through all of the objects that it's managing to see if they need to be persisted to the database.
We then render the view. It is important that the createView method is placed after the handleRequest method. Otherwise, changes done in the * SUBMIT events aren't applied to the view.
Now, with what know, we can go a little further and add some features to our application. First, let's edit our PostController like so:
namespace App\Controller; use App\Entity\Post; use App\Repository\PostRepository; use Sensio\Bundle\FrameworkExtraBundle\Configuration\Method; use Sensio\Bundle\FrameworkExtraBundle\Configuration\Security; use Symfony\Bundle\FrameworkBundle\Controller\Controller; use Symfony\Component\HttpFoundation\Request; use Symfony\Component\HttpFoundation\Response; use Symfony\Component\Routing\Annotation\Route; use Symfony\Component\Form\Extension\Core\Type\TextType; use Symfony\Component\Form\Extension\Core\Type\TextareaType; use Symfony\Component\Form\Extension\Core\Type\SubmitType; class PostController extends Controller { /** * @Route("/posts", name="posts") */ public function index(PostRepository $repository): Response { $posts = $this->getDoctrine() ->getRepository(Post::class) ->findAll(); return $this->render('posts/list.html.twig', ['posts' => $posts]); } /** * @Route("/posts/new", name="new") * @Method({"GET", "POST"}) */ public function new(Request $request) { $post = new Post(); $form = $this->createFormBuilder($post) ->add('title', TextType::class) ->add('content', TextareaType::class) ->add('excerpt', TextareaType::class) ->add('create', SubmitType::class) ->getForm(); $form->handleRequest($request); if ($form->isSubmitted() && $form->isValid()) { $em = $this->getDoctrine()->getManager(); $em->persist($post); $em->flush(); $this->addFlash('success', 'post created'); return $this->redirectToRoute('posts'); } return $this->render('posts/new.html.twig', [ 'form' => $form->createView(), ]); } /** * @Route("/{id}/show", requirements={"id": "\d+"}, name="show") * @Method("GET") */ public function show(Post $post): Response { return $this->render('posts/show.html.twig', [ 'post' => $post, ]); } /** * @Route("/{id}/edit", requirements={"id": "\d+"}, name="edit") * @Method({"GET", "POST"}) */ public function edit(Request $request, Post $post): Response { $form = $this->createFormBuilder($post) ->add('title', TextType::class) ->add('content', TextareaType::class) ->add('excerpt', TextareaType::class) ->add('edit', SubmitType::class) ->getForm(); $form->handleRequest($request); if ($form->isSubmitted() && $form->isValid()) { $em = $this->getDoctrine()->getManager(); $em->flush(); $this->addFlash('success', 'post edited'); return $this->redirectToRoute('posts'); } return $this->render('posts/edit.html.twig', [ 'post' => $post, 'form' => $form->createView(), ]); } /** * @Route("/{id}/delete", requirements={"id": "\d+"}, name="delete") * @Method({"GET"}) */ public function delete(Request $request, Post $post): Response { $em = $this->getDoctrine()->getManager(); $em ->remove($post); $em ->flush(); $this->addFlash('success', 'post deleted'); return $this->redirectToRoute('posts'); } }
src/Controller/SimpleController.php file edited
We can now create two additional templates:
{% extends 'base.html.twig' %} {% block body %} <h1>{{ post.title }}</h1> {{ post.content }} <a href="{{ path('posts') }}">Back</a> {% endblock %}
templates/posts/show.html.twig file
{% extends 'base.html.twig' %} {% block body %} <h1>Edit post</h1> {{ form_start(form) }} {{ form_widget(form) }} {{ form_end(form) }} <a href="{{ path('posts') }}">Back</a> {% endblock %}
templates/posts/edit.html.twig file
Now, we can read, edit our delete the posted we have created with our application.
Conclusion
Through this article we took a look at Symfony 4. We had an overview of the different concepts it is based on. We set up an installation of Symfony 4 and created a very simple application that let us interact with a MySQL database.
Now, we still have many things to see, like Security Annotations our custom Twig Filters that allow us to build a better application.
One last word
If you like this article, you can consider supporting and helping me on Patreon! It would be awesome! Otherwise, you can find my other posts on Medium and Tumblr. You will also know more about myself on my personal website. Until next time, happy headache!
1 note
·
View note
Text
A Complete Guide to Your PHP Server in 2020
One of the reasons why the professional developers use PHP for their web application is that PHP is a very suitable and reliable back-end programming language. In this article, you will find the complete guide to select your local/remote back-end server which runs PHP and provides necessary web tools all along. According to the StackOverflow’s 2018 survey, PHP the most used back-end language after Python and almost 1/3 of the professional developers use PHP to develop their web application. PHP as a Back-End Language PHP is a programming language that runs on the server-side, also called the back-end side. The back-end is a part of the web application that runs in the server. In other words, it interacts with the server, gets some information and relays it to the front-end to display on the screen. You can do many things on the server by using PHP including CRUD (Create, Read, Update, Delete) operations. For example, when you submit a form on the web page, the back-end takes this data you filled in the form and passes it to the server, after that, the PHP code in the server saves that data in a database and sends some confirmation info to the front-side. Then the front-side displays the confirmation of your submit action. Using PHP as Back-end You can use PHP, your goal can be developing a web application, writing a command line script or developing a desktop GUI application. For developing a web application, you need PHP itself, a browser, a server supports PHP and a web hosting service. In the modern operating systems, there are web browsers, and in-built web servers (e.g. Windows: IIS and Linux/MacOS: Apache). After you obtain a web hosting, you can begin to write PHP code. If you want to use PHP language for command line scripting you don’t need any servers or browsers, and also with the PHP-GTK extension, you can develop desktop GUI applications. Select your PHP Server Before you decide to develop a PHP web application, you must first select local web server for development purposesremote web server for hosting your products. In addition to PHP Servers, if you are using some other web-tools, it’s better to use third-party programs which provide these necessary tools together. Selecting a local PHP server. XAMPP XAMPP is the most popular open-source PHP local server. XAMPP has a free Apache server and contains MariaDB, PHP, and Perl. It also supports many tools like MySQL, FileZilla, Mercury, Tomcat, and others. It allows programmers to test their applications easily. XAMPP is available for Linux, Windows and macOS systems. WAMP WampServer is a web server for Windows. WAMP is an alternative to XAMPP. It supports Apache, PHP, and MySQL. Its interface is an easy-to-use platform having Apache configurations, PHP configurations, WWW directory etc. MAMP MAMP is a free PHP local server developed for macOS systems but can also be installed under Windows. It stands for Mac, Apache, MySQL, and PHP. It supports not only the Apache server but also Nginx as well. MAMP PRO, a paid-version, allows you to create separate hosts for each of your projects. LAMP LAMP stands for Linux, Apache, MySQL, and PHP. LAMP is developed for Linux operating systems and it includes FastCGI, OpenSSL, phpMyAdmin, ModSecurity, SQLite, Varnish, ImageMagick, xDebug, Xcache, OpenLDAP, ModSecurity, Memcache, OAuth, PEAR, PECL, APC, GD, cURL and other components and the following frameworks: ZendFramework, Symfony, CodeIgniter, CakePHP, Smarty, Laravel. LEMP LEMP is a variety of LAMP. LEMP stands for Linux, NGINX, MariaDB, and PHP (Because of the pronunciation of NGINX, “E” is used instead of “N”). Apache is replaced with the NGINX and also uses MariaDB for handling database operations. It also works fine as a relational database – just like MySQL but offers some other added functionalities. AMPPS AMPPS is a combination of WAMP, MAMP and LAMP stack. The platform offers 449 Apps along with Apache, MySQL, MongoDB, PHP, Perl & Python. The platform supports both MacOS, Linux and Windows operating systems. AMPPS web server enables you to focus more on web apps rather than maintaining them. AMPPS is provided by Softaculous. AMPSS stack includes everything for website development. You can do all complex functions with just a click. WinNMP WinNMP is a development stack for Windows. It provides a lightweight, fast and stable server, based on Nginx, MariaDB, Redis, and PHP. WPИ-XM WPИ-XM is an open-source server for PHP development on Windows. WPИ-XM stands for : Windows, PHP, NGINX, Xdebug, MariaDB/MongoDB. WPИ-XM offers various easy-to-install services to developers. The stack consists of NGINX as the webserver, MariaDB as the database and PHP as the scripting and programming language. The stack includes essential utils for PHP development like Composer, Pickle, PHPUnit, phpcsfixer, PEAR out-of-the-box. EasyPHP-DEVSERVER EasyPHP Devserver is a complete and ready-to-use web server for Windows including PHP, Apache, MySQL, Nginx, PhpMyAdmin, Xdebug, PostgreSQL. Devserver is portable, modular and easy to update and extend. Devserver allows you to set up a server with the same specifications as a production server. Since it is portable, you can develop locally anywhere. Selecting hosting PHP Server When you decide to deploy your web application, you must first select your hosting server. The hosting server hosts your application, provides some built-in resources like databases, caching tools and other tools for website optimization. Today, there are lots of open-source PHP servers available. Most of them use Apache as a server, while others prefer Nginx. You can compare PHP Hosting Plans from this link. EasyPHP-Webserver turns your computer into a ready-to-use personal and dedicated server for web, database, and FTP hosting. You can host your own website on your computer and share it on the internet. Your computer acts like a web hosting service You can tune Apache (host server), MySQL (database server), PHP (web development), Filezilla (FTP server). In conclusion, When you decide to use PHP as your back-end language, you should use a local web server for development and a remote webserver to host your application. In case you need additional web tools with PHP server, you should use stack programs that provide all necessary tools together such as XAMPP, WAMP, MAMP, LAMP, LEMP, AMPPS, WinNMP, WPИ-XM, EasyPHP-DevServer. After you developed your application locally, you need to select your hosting server to deploy it. Further Reading: - How to Hire a Great PHP Developer by Toptal Read the full article
0 notes
Text
PHP boilerplate examples you should use
Looking for a PHP boilerplate? PHP Boilerplates are in fact minimal PHP projects you can use to launch a development task faster and simpler than usual.
You shouldn’t confuse them for MVC framework.
These projects do not possess a fully-featured resource library, but rather provide you with the basic tools you need to develop simple apps while you’re still learning.
Check out these PHP boilerplate examples
CodeIgniter
CodeIgniter is a popular PHP boilerplate for developing applications, and a suitable kit of tools for every user familiar with PHP sites. It aims to make project delivery faster and more successful, as you’re not writing your codes from scratch, but using library resources arranged in a logical manner.
CodeIgniter also enhances your creativity, as the coding burden is off the picture. The recommended versions are PHP 5.6 (and newer ones) – the framework may still do for 5.4.8 users, but we don’t recommend it because some features may be missing. Another risk is facing serious performance and security issues.
Phalcon Framework
Phalcon Framework is an open-source web development tool offered as a PHP C extension that lowers the consumption of resources against maximal performance. It was written using Zephir/C with all platform independence considered, and it is thus available to use on Windows, MacOS, GNU/Linyx, and FreeBSD.
With this PHP boilerplate, you can choose between building your own binary package, or downloading a ready-to-use one from the site.
Cake PHP
If looking for a rapid PHP boilerplate that works with all popular design patterns (MVC, Data Mapping, Front Controller, and so on), look no further than Cake PHP. The structure of this framework makes it suitable for all users regardless of their PHP level, which is how developers create robust and good-looking apps even without experience.
Cake PHP is flexible and installed using Composer, and offers a premade skeleton you can use to launch your app development projects. For an already existing application, run the following:
$ composer require cakephp/cakephp:"~3.4"
Zend
Zend Framework collates several different PHP packages for professionals with over 141 million available installations. With it, you can develop PHP applications and services, or use any of its multiple language features and 100% object-centred codes.
Again, the dependency manager is Composer, but also PHPUnit that tests the different packages and Travis CI that allows unlimited integration. Zend Framework is also well-known for following PhP-FIG rules and standards, and implementing PSR-7 for HTTP message interfaces.
Developers are currently running and promoting the third version of their product (Zend Framework 3) which combines the best features of Zend Framework 2 and 1, both downloaded over 15 million times throughout the years. The founder and leading sponsor is Rogue Wave’s Zend Company, but the app has many other contributors and partners.
For instance, it is supported by Microsoft, Google, and StrikeIron which are regularly providing it with services and technologies that enhance users’ experience.
Yii
Yii is another top PHP boilerplate for developers looking for modern and high-performing PHP frameworks. It is designed to help building complex applications and delivering important projects in time. Its name is actually pronounced as Yee, and stands for ‘Yes It Is!, a consisted description for what Yii can and will do for novice developers – provide them with a fast, secure, and very professional environment to complete their projects.
The best thing about Yii is that it is open-source, and it promotes modern, clutter-free PHP5 design and rapid development absolutely for free. Thus, you can turn to it at any stage of your project’s development, and use it to ensure you’re creating an efficient and maintainable product.
Yii is also fully performance-optimized, and works well for projects of all types and sizes. Its main target group, however, and developers of enterprise applications which search for full, head-to-toe configuration and presentation-to-persistence control in line with that they were asked to do. The framework will make this easier for them with testing and debugging features, and its clean, compact documentation base.
Fat Free
All of Fat Free (or F3’s, as some like to call it) top notch functionality is condensed in a single 65KB file, including its rock-solid development foundation, mature code bases, code writing-free approach to app creation. The suite is extremely easy to use, but yet puts in place one of the best-in-breed cache engines that allow URL routing, code highlighting, and support for Multilanguage products and applications.
Hence, F3 will help you deliver projects effortlessly and in time, and won’t stand in your way while coming up with interesting solutions.
The Fat Free PHP boilerplate makes sense for both novice and professional PHP programmers, as there is no cumbersome installation or unnecessary, convoluted directory structures to worry about. In fact, it is so simple that you can start using it as we speak.
F3 will support both SQL and NoSQL databases, including the most popular ones such as MongoDB,MySQL, MSSSQL, DB2, Sybase, and PostgreSQL. Inside, you will also discover a number of great object-relational mappers in charge of data modelling and abstraction, which won’t be more difficult to use than the framework itself. No configuration works will be needed at all.
Fuel PHP
FuelPHP is a very flexible, intuitive, and community-driven framework for PHP 5.3+ developers, which collates a number of best-in-breed practices for those of you lacking inspiration. Its structure is unique and MVC-based (model-view-controller), developed with the aim to ensure full HMVC support for all users.
Recently, the framework was enriched with new ViewModels (presentation models) that help add interesting layers between Controller and View modes. Another handy feature is the router-based approach, as the user can route directly to deal closure with his input uri, and maintain control over the upcoming execution of the project.
MINI
Most developers would describe MINI as a very simple and intuitive skeleton PHP tool, which won’t overwhelm you with the complex, ultra-powerful engines typical for professional frameworks, but will still deliver enough functionality for the creation of simple sites.
In order to show a couple of pages, it will be enough to make few database calls, do some occasional tweaks with AJAX, and the page will run smoothly wherever you need it. At the same time, you won’t be expected to read tons of development documentation or to undergo complex installation procedures.
Laravel
Laravel has one of the most expressive and elegant syntaxes for web application development, and focuses on transforming this process into an engaging and enjoyable experience. The framework eases a variety of development tasks common to all web projects, among which:
A fast and simple routing engine
An advanced container of dependency injection
Cache and session storage facilitated with several back-ends
An intuitive and expressive ORM database
Agnostic database schema migrations.
Robust job processing in the background.
Broadcasting of events in real time.
Laravel is very powerful, but that doesn’t change the fact that it is very accessible and easy-to-use by development juniors. It combines elegance, simplicity, and innovation in a single, superb package, and provides you with the tools you need to build any type of application.
Symfony
Symfony unites several important PHP components alongside web application developing, the most popular of which are Community and Philosophy. Developers are offered a suite of reusable PHP elements used to develop all sorts of different applications. Many popular performers were designed using Symfony, among which projects such as Drupal, Magento, and BlaBlaCar.com.
If you liked this article with PHP boilerplate examples, you should check out these as well:
NodeJS boilerplates that you should start using
WordPress boilerplates to use for your themes and plugins
12 Useful AngularJS Boilerplates
React Boilerplates That You Should Know Of
Social Media APIs That You Can Use
The post PHP boilerplate examples you should use appeared first on Design your way.
from Web Development & Designing http://www.designyourway.net/blog/resources/php-boilerplates/
0 notes